Table of Contents
Yoga is an ancient practice that involves movement, meditation, and breathing techniques. It originated 5,000 years ago in the Indus Sarasvati Civilization of northern India. Practicing yoga regularly boosts physical and mental health. But did you know that yoga can also do wonders for your legs?
Although yoga is easy to perform, many people don’t know about the yoga poses you can perform with your legs.
1. What is Yoga?

Yoga is an old technique that engages your mind and body, enhancing your overall health. Yoga exerts all the muscles in your body equally, which helps in properly toning the body. For many, yoga is just exercise, while for others, it is a way of life.
Yoga can help to strengthen and tone the muscles in the legs. According to a 2016 NCBI study, those who took part in the 10-week biweekly yoga group increased their flexibility and balance more than the group that didn't practice yoga.
It is most beneficial for those who are athletic and want to work out their lower body.
The best part is that there is no age limit; you are never too old to perform yoga.
2. Benefits of Yoga for Legs
It is one of the best techniques to strengthen your mind and soul. There are multiple yoga poses, but each pose has a different method. Every single pose is important in specific ways.

- Boosts the balance between strengthening and stretching that helps you to gain more flexible and powerful legs.
- Improves muscles tone and strengthens joints
- Improves breathing
- Lowers levels of stress and any muscle pain
- Relaxes the body
- Enhances mental health
2.1. Benefits of Yoga for Mental & Spiritual Well-Being
Yoga lifts the mood. After a long busy day, a few minutes of breathing and meditation yoga techniques can help you relax and release all of that tension/stress. A relaxed mind can allow you to tune into yourself and attain inner peace.

Be Aware:
If you are suffering from a musculoskeletal injury, any injury to a bone, ligament, joints, tendons, and muscles, then don't perform yoga. Always check with your doctor before practicing yoga.
3. Tips for the beginners
If you are a beginner and want to start yoga, there are certain tips you should keep in mind.
- Be consistent
- Practice yoga 2-3 times a week
- Start performing yoga slowly
- Maintain your breath while practicing any pose
- Do not eat before practicing
- Give yourself time, don’t force something on yourself
4. Yoga poses for legs
Here are four yoga poses to get you started.
4.1. Downward-Facing Dog Pose
It is one of the most well-known poses for beginners.
Importance:
It improves the flexibility of the glutes, calves, hamstrings, and lower back. Your shoulders and upper back are also worked on. It is mostly used to reduce lower back pain.

How to practice this pose:
- If you want to be more comfortable, then use a yoga mat.
- Make sure that your hands are raised in front of your shoulders and your knees are bent until they are level with your hips.
- Extend your palms and toes properly on the yoga mat.
- Relax with a deep breath and start moving your hands and toes. Make sure your arms and legs are straight.
- Balance your weight. The weight exerted on your palms should be equal to the weight exerted on your toes, both being pressed on the mat. Move in a way that your spine and tailbone are elongated.
- Look at your toes. You should be in a straight, proper line.
- If you are flexible, then it is normal for there to be some distance between the floor and your feet.
Don’t do it:
If you have any sort of chronic injury, carpal turner syndrome, blood pressure issues, or pregnancy, then skip this pose.
4.2. Warrior II Pose
This pose strengthens the whole body. It improves endurance and increases the flexibility of your groin, chest, and inner thighs. It improves digestion and provides pain relief for your back. This is a standing pose that helps to lengthen muscles and improve posture.
Importance:
This single pose can strengthen your leg muscles. It increases your stability and balance and improves the flexibility of hip muscles.

How to practice this pose:
- Stand with your feet more than shoulder-width apart. Your right foot should face forward along the length of the mat. Your left foot should point to the left of the mat.
- Bring your arms to shoulder height and extend them with your fingertips facing outward.
- Bend the right leg at 90° and make sure the left leg is straight. You're bent right knee should come up just above your toes
- When you bend your right leg, it will extend your groin and thigh muscles. If it’s difficult for you to extend your feet any wider, then don’t push yourself. Don’t put any pressure on your leg as it can cause pain.
- When you bend your right foot, you can feel your hamstrings, quads, and glutes stretching.
- Press the palm of your right arm against your right leg onto the floor. This will activate your calf muscles.
- Alternate your feet and arms, doing this pose for almost 30 to 60 sec on each side.
Don’t do it:
Always keep in mind that while practicing this pose, distribute your weight equally on both legs. If you put more pressure on one leg, it may cause pain or a serious injury. If you are suffering from knee pain, diarrhea, high blood pressure, or had recently had surgery, then don’t do this pose.
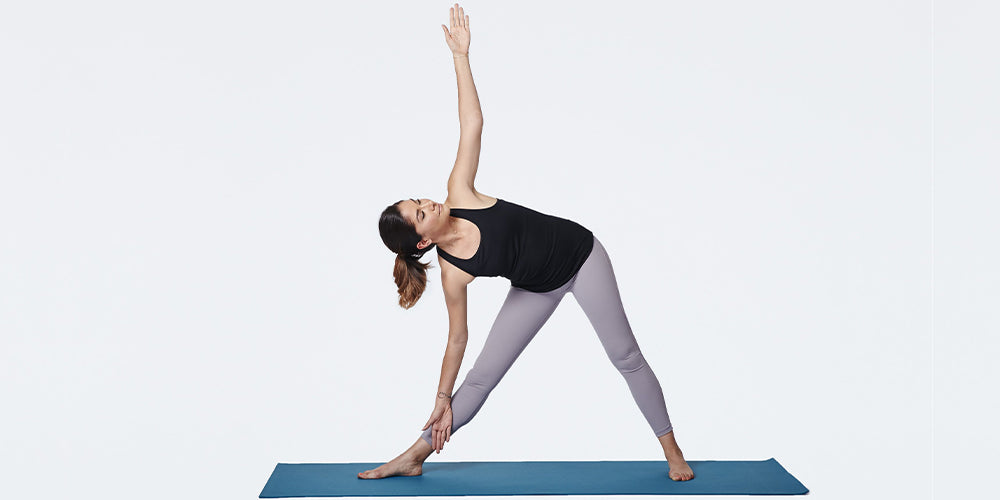
4.3. Triangle Pose
This pose helps strengthen your legs and increases the flexibility of the hips, spine, groin, chest, shoulders, hamstrings, and calves. While doing this pose, you can feel movement in your hamstrings.
Importance:
It increases your resistance and endurance. This pose focuses on strengthening your hips, back, and thigh muscles.

How to practice this pose:
There are various ways to do this pose, but one of the best is to do this pose after the warrior II pose because the triangle pose requires the same posture you use for the warrior II.
- Position both of your feet properly. Stand straight and slowly stretch your legs. Extend your arms out.
- Move your right hand slowly and touch your ankle. If you are more flexible, then your right hand can easily touch the floor. Choose a practice that is safe and more comfortable for you.
- When you bend your right arm into the right leg, this will allow back movement in your hips. Move your head back to check your left fingertips. If you cannot easily see your left fingertips, do not worry. Move your head by rotating.
- Move your right thigh muscles in an upward direction.
- Don’t put any pressure on your right knee otherwise, it can cause pain or hypertension issues.
- Stay in this position until you have taken five breaths.
- Then after completing the right leg pose, do the same pose to your left leg.
4.4. Goddess Squat
This pose is well known for its style as it tones your lower body muscles. This pose is especially popular among women.
Importance:
- Strengthen and tone the muscles in your thighs, glutes, calves, hips, and ankles
- Work out the chest and hips
- Stretches the spine and relieves back pain
- Provides energy to the whole body
- Boosts inner peace
- Helps to improve heart and lung functions
- Excellent for pregnant women as it reduces complications during childbirth.

How to Practice this pose:
- Stand in a comfortable position with your hands by your side. Slowly put your hands on your hips
- Extend your feet with your heels in and toes pointing out at a 45° angle towards the mat corners
- Take a deep breath. Slowly push your hips back slightly and bend your knees to make a 90° angle.
- Hip posture is very important in this pose. Don't push your hips back too much. To prevent this, you can practice this pose while pressed against a wall
- Your thighs should be parallel to the floor.
- Position your knees above the ankle
- Ease your shoulders and spine
- Keep doing this posture for five deep breaths.
5. Conclusion
If you want to be physically active and healthy, then add/incorporate physical exercise into your routine. The best form of exercise is yoga. Yoga not only strengthens your muscles but also keeps your body in shape. A lack of exercise can cause stress and affect your flexibility.
There is no right time to start the exercise. If you want to then start right away.
"This article is originally posted on borntough.com, and borntough.com own the sole copyright on this article. If you read this article outside borntough.com, please report this website to the authority because they have stolen the content from borntough.com and violated borntough copyright"
